If you’re looking for the best Analog Obsession plugins, you’re in the right place. Analog Obsession has built a reputation for delivering high-quality emulations of classic studio hardware that actually sound authentic and work reliably in real-world sessions. I’ve tested each of these plugins to see how they perform on different source material, and what I found is that they’re not just solid emulations but genuinely useful tools you can reach for regularly.
This collection covers everything from SSL-style bus compression to Pultec EQ sweetening, from Neve channel strips to specialized processors like transient shapers and de-essers. You’ll find plugins like BUSTERse, ATONE, FetCB, SSQ, POORTEC, UREQ, COMPER, OAQ, LOADES, CHANNEV, and ATTRACTOR in this guide. Each one brings something different to the table, whether you need broad strokes for mixing or surgical precision for mastering work.
What makes these plugins worth using is that they don’t just mimic the look of vintage gear. They capture the actual sonic behavior and workflow that made the originals so valuable in professional studios. Let’s get into what each one does and how you can use them in your productions.
Analog Obsession BUSTERse
- Compatibility: Win10, Win11, Apple Silicon, macOS 10.12+
- Format: VST, VST3, AU, AAX, 64-bit
- Price: Free
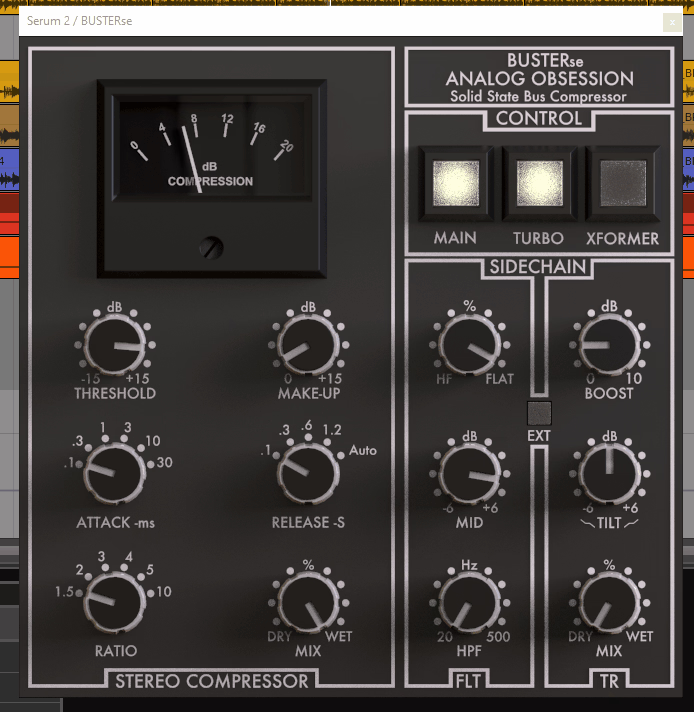
The BUSTERse is modeled after the legendary SSL bus compressor found on G-Series consoles, and it’s one of those processors that just works on mix buses without overthinking it. You get that characteristic glue that holds your mix together while adding a bit of punch, and the interface stays true to the original hardware layout so there’s no learning curve if you’ve used the real thing or other emulations.
What’s particularly useful here is how the auto-release responds to your program material. Instead of setting fixed times that might work for some sections but not others, the auto mode adapts to what’s happening in your mix. The ratio control gives you everything from gentle 2:1 compression up to more aggressive 10:1 limiting, though I find the sweet spot usually sits between 4:1 and 6:1 for bus work.
The makeup gain compensates automatically as you compress, which helps you judge what the compression is actually doing rather than just hearing things get louder. You also have a sidechain filter that lets you reduce low-frequency pumping by filtering out the lows before they hit the detection circuit. This is especially helpful on full mixes where kick drums might otherwise trigger too much gain reduction.
There’s a harmonic distortion section that adds some of that analog transformer color without needing to drive the compressor hard. You can dial in saturation independently, which means you can get clean compression with warmth or keep things totally transparent. The plugin also includes dual mono operation so you can compress each channel separately when you need more control, though the default stereo link works great for most applications.
Analog Obsession ATONE
- Compatibility: Win10, Win11, Apple Silicon, macOS 10.12+
- Format: VST, VST3, AU, AAX, 64-bit
- Price: Free
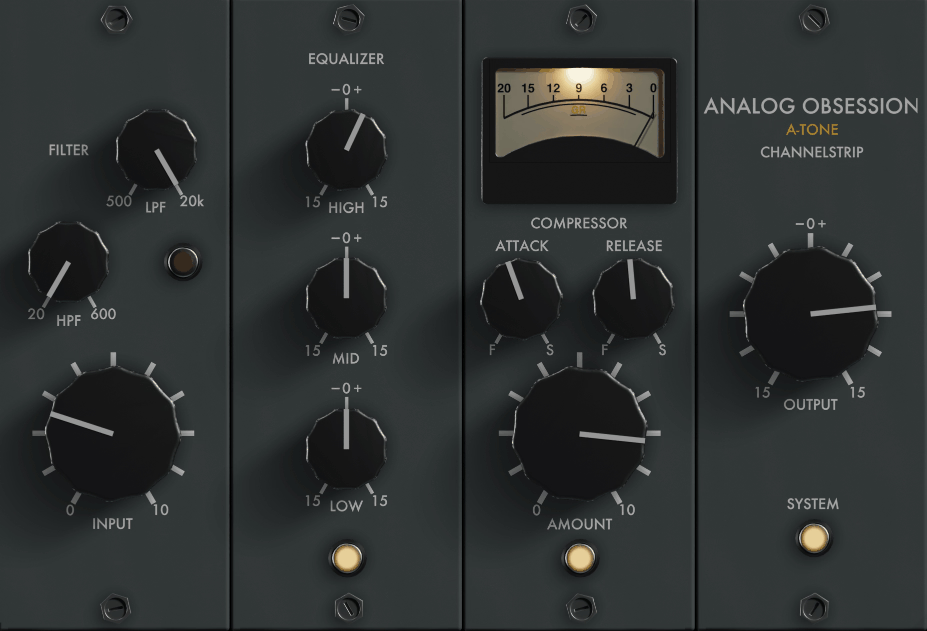
ATONE brings you an Altec-style channel strip that combines EQ and dynamics in one plugin, which is useful when you want to shape and control a track without loading multiple processors. The workflow here is straightforward since everything’s laid out in a logical signal flow, and you can quickly dial in your sound without jumping between windows.
The equalizer section features four bands with selectable frequencies and broad curves that feel musical rather than surgical. You’re working with fixed frequency points similar to the original hardware, which actually helps you make faster decisions instead of endlessly sweeping parametric bands. The low and high frequency bands have shelving options that work well for broad tonal shaping, while the two midrange bands let you enhance presence or tame problem areas.
For dynamics control, you get both a compressor and an expander/gate in the same unit. The compressor has that vintage character where it adds cohesion to vocals or individual instruments without sounding obviously processed. The threshold and ratio controls respond smoothly, and there’s an attack and release section that lets you shape how the compression responds to transients. The expander works great for cleaning up noise between phrases or tightening up drum tracks.
What makes this channel strip practical is how the EQ and dynamics interact when you use them together. You can boost some frequencies that need emphasis while compressing to control peaks, and the result tends to sound more natural than processing with separate plugins. There’s also a phase reverse switch and high-pass filter in the input section, which helps you clean up low-end mud before the signal hits the EQ and compressor stages.
Analog Obsession FetCB
- Compatibility: Win10, Win11, Apple Silicon, macOS 10.12+
- Format: VST, VST3, AU, AAX, 64-bit
- Price: Free
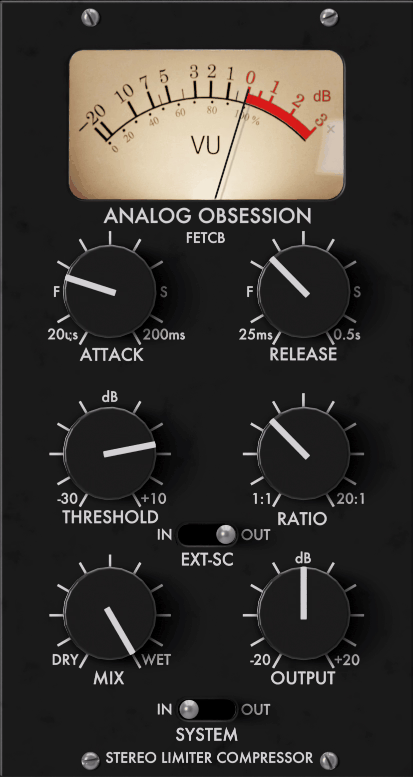
The character you get from FetCB is based on British FET compression that’s known for adding aggression and attitude to sources that need it. This isn’t a subtle, transparent compressor but rather something you reach for when you want your drums to hit harder or your bass to feel more assertive in the mix.
You’ll find multiple ratio options ranging from gentle 2:1 up to more extreme settings, and each one has a different flavor beyond just the amount of gain reduction. The attack times go fast enough to catch transients or slow enough to let punch through, which gives you real control over whether you’re compressing the body of the sound or the initial impact. There’s a release control that ranges from quick to slow, and getting this right makes the difference between compression that pumps obviously versus compression that just makes things feel bigger.
One feature that stands out is the HPF sidechain that you can engage to prevent low frequencies from triggering the compressor unnecessarily. This is valuable on full mixes or complex program material where you want the compressor responding to midrange content rather than being fooled by bass energy. The output control lets you match levels easily, and there’s a clip LED that warns you when you’re hitting the output too hard.
The harmonic saturation adds some grit when you push things, which is part of what gives FET compression its character. You can use this plugin transparently if you keep the gain reduction moderate, or you can really slam it to get that aggressive sound that works on rock drums and distorted guitars. There’s also a blend control that lets you mix the compressed signal with the original, giving you parallel compression within the same plugin instance.
Analog Obsession SSQ
- Compatibility: Win10, Win11, Apple Silicon, macOS 10.12+
- Format: VST, VST3, AU, AAX, 64-bit
- Price: Free
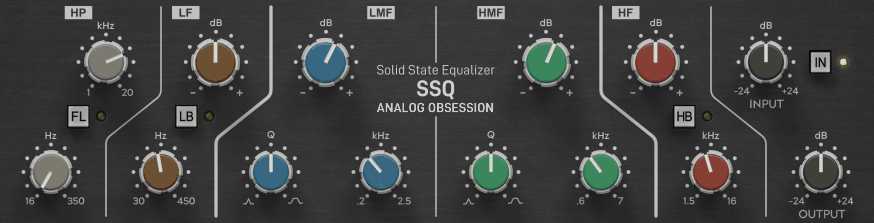
SSQ recreates the SSL E-Series EQ that you’ll find on countless records across every genre. The sound of this EQ is familiar even if you’ve never used the hardware because it’s been on so many professional productions over the past few decades. What makes it useful is how quickly you can make things sound better without overthinking frequency choices or getting lost in endless parameters.
The design gives you four bands of EQ with high and low pass filters on the ends. Each band has selectable frequencies rather than fully parametric sweeps, which actually speeds up your workflow because you’re choosing from frequencies that are known to work well musically. The Q controls on the mid bands let you go from broad, gentle curves to more focused corrections, and the high and low frequency sections switch between shelving and bell curves depending on what you need.
There’s a high-pass filter that’s useful for cleaning up low-end rumble, and it has a gentle slope that doesn’t thin out your sound too dramatically. The low-pass filter on the high end can smooth out harsh sources without making them sound dull. The resonant high-pass filter mode adds a little boost right at the corner frequency, which can add some warmth or thickness when you engage it.
What’s practical about this EQ is how it handles boosting versus cutting. You can make pretty significant boosts without things falling apart tonally, and cuts sound natural rather than creating obvious holes in the frequency spectrum. The phase relationship stays coherent across the frequency range, so you can use this EQ on individual tracks or even across your entire mix bus without phase issues accumulating. There’s also an EQ in/out switch so you can quickly A/B your changes, which is essential for making sure you’re actually improving the sound rather than just making it different.
Analog Obsession POORTEC
- Compatibility: Win10, Win11, Apple Silicon, macOS 10.12+
- Format: VST, VST3, AU, AAX, 64-bit
- Price: Free
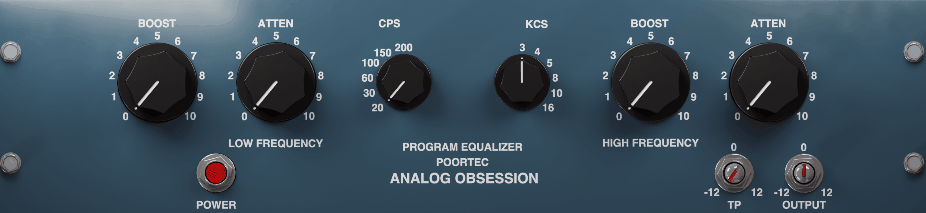
When you need that classic Pultec EQ sound, POORTEC delivers the same kind of broad, musical curves that made the original units studio staples for decades. This is the EQ you use when you want to add weight to the low end or bring out air in the high frequencies without making things sound processed or artificial.
The low-frequency section lets you boost and attenuate at the same frequency, which is the famous Pultec trick that adds low-end weight while keeping things tight. You can boost at 60Hz to add sub-bass warmth, then cut at the same frequency to reduce muddiness, and somehow the combination sounds better than either operation alone. The available low frequencies range from 20Hz up through 100Hz, giving you options for different instruments and program material.
Up in the high-frequency range, you get shelving boost that adds presence and air without harshness. The frequency selections cover everything from 3kHz up to 16kHz, so you can emphasize different aspects of the high end depending on what the source needs. There’s also a high-frequency attenuation section with its own set of frequencies, which works great for smoothing out brittle recordings or reducing digital harshness.
The bandwidth control on the low frequency section lets you adjust how broad or focused your low-end changes are. Wider settings affect more of the frequency spectrum and sound more natural, while narrower settings let you target specific problem areas or enhance particular notes. The plugin also maintains the asymmetrical boost and cut curves of the original hardware, which is part of what gives Pultec EQs their distinctive character.
You’ll find this EQ especially useful on bass-heavy sources like kick drums, bass guitar, and full mixes where you want to add foundation without bloat. It’s also excellent for mastering applications where you need gentle, broad changes that enhance rather than correct. The phase response is part of the sound here since it contributes to that warm, cohesive quality that makes Pultec-style EQ so sought after.
Analog Obsession UREQ
- Compatibility: Win10, Win11, Apple Silicon, macOS 10.12+
- Format: VST, VST3, AU, AAX, 64-bit
- Price: Free
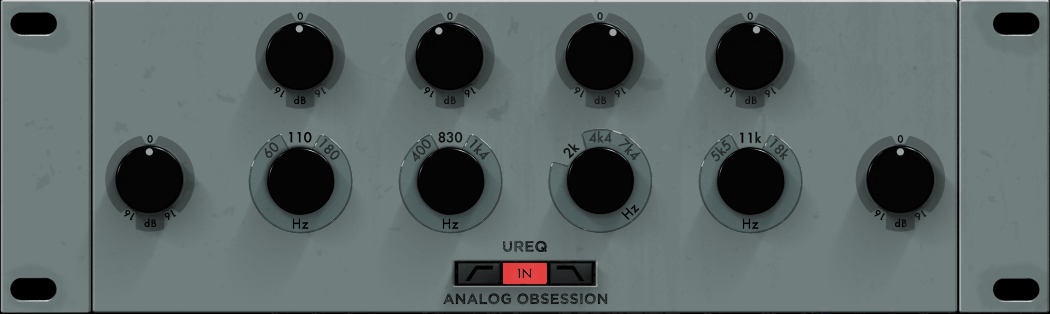
UREQ gives you a custom four-band EQ that’s designed for surgical corrections and musical enhancements in one package. Unlike some EQs that are modeled after specific hardware, this one takes a more flexible approach while still maintaining analog-style curves and behavior.
Each of the four bands is fully parametric with continuously variable frequency, Q, and gain controls. This means you can place your EQ changes exactly where they need to be rather than being limited to fixed frequency points. The frequency range on each band overlaps significantly, so you have the flexibility to use multiple bands in the same general area if you need to address complex problems or build up specific tonal characteristics.
The Q control on each band ranges from very broad curves that affect large portions of the spectrum down to narrow cuts that can surgically remove resonances or feedback frequencies. Broad boosts sound musical and natural, while tight cuts remain transparent and don’t create obvious holes. You can boost or cut by substantial amounts, though the sweet spot for musical applications usually sits in the 3-6dB range.
What makes UREQ practical is how the filter types work on the outer bands. The low and high frequency sections can switch between bell curves and shelving filters, giving you the right tool for broad tonal shaping or focused problem-solving. There are also high-pass and low-pass filters with selectable slopes, which clean up extreme lows and highs without affecting your primary EQ moves.
The plugin includes an output gain control so you can compensate for overall level changes when you’re making substantial EQ moves. There’s also a spectrum analyzer that shows you what’s happening across the frequency range, which helps you identify problem areas and verify that your EQ changes are doing what you intend. An EQ curve display shows your combined EQ moves visually, making it easier to understand how your different bands interact.
Analog Obsession COMPER
- Compatibility: Win10, Win11, Apple Silicon, macOS 10.12+
- Format: VST, VST3, AU, AAX, 64-bit
- Price: Free
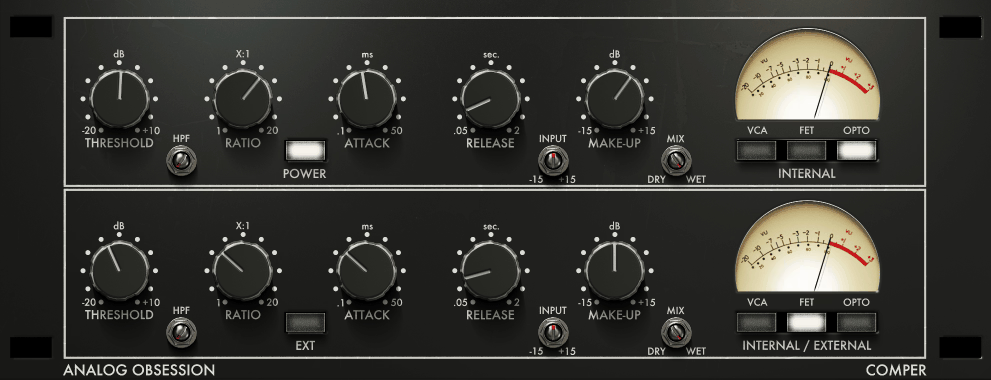
The serial dual compressor design in COMPER lets you run two different compression stages on the same signal, which gives you more control than a single compressor while keeping everything in one plugin. This approach works well when you need to catch fast peaks with one stage while adding musical compression with another.
The first compressor stage can handle initial gain reduction with faster attack times to control transients, then the second stage applies more gentle compression with slower timing to add glue and cohesion. You get independent threshold, ratio, attack, and release controls for each stage, so you can set them up to complement each other rather than just doubling up on the same settings.
One useful approach is setting the first stage for fast peak control with a higher ratio, then using the second stage for slower, lower-ratio compression that adds sustain and density. The first stage catches the peaks so they don’t hit the second stage too hard, and the second stage does the musical work of making things feel more together. You can also reverse this and use the first stage for gentle, slow compression while the second stage provides fast peak limiting.
The knee control on each stage lets you adjust how gradually the compression engages. Hard knee settings give you more obvious compression that works well for aggressive styles, while soft knee compression sounds more transparent and musical for most applications. The sidechain filters on each stage help you prevent low-frequency pumping or high-frequency sensitivity from triggering the compressors inappropriately.
Each stage has its own gain reduction meter so you can see exactly what each compressor is doing, which helps you balance the work between the two stages effectively. There’s also output gain on each stage and a final output control, giving you multiple points where you can manage levels. The auto-makeup gain option on each stage helps you maintain consistent monitoring levels while you dial in your compression settings.
Analog Obsession OAQ
- Compatibility: Win10, Win11, Apple Silicon, macOS 10.12+
- Format: VST, VST3, AU, AAX, 64-bit
- Price: Free
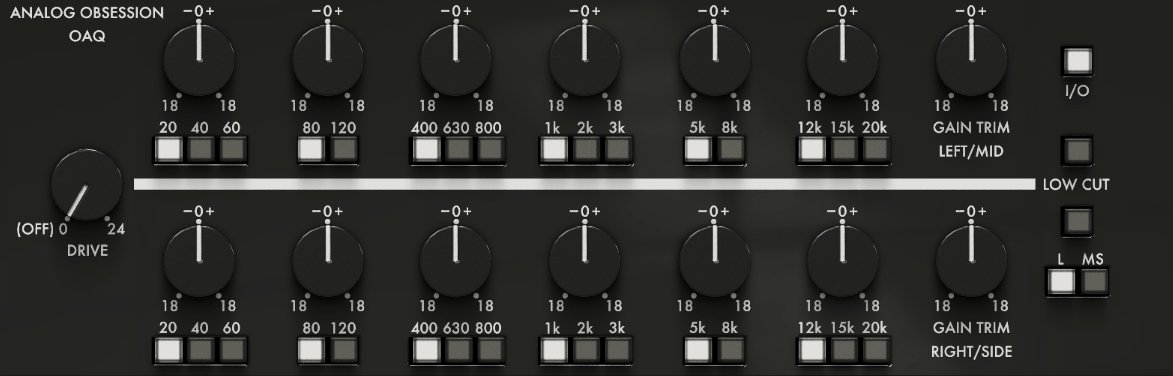
OAQ is built specifically for mastering applications where you need extremely transparent EQ that can work in mid-side mode for width control and surgical corrections. This is the EQ you reach for when you’re making final adjustments to a mix and you need precision without adding coloration.
The mid-side processing capability means you can EQ the center of your mix independently from the sides, which is incredibly useful for mastering work. You might boost the mids to bring up lead vocals or kick drums that sit in the center, while cutting the sides to reduce harshness in guitars or cymbals that are panned wide. Or you can do the opposite and enhance the stereo field without affecting the centered elements.
Each EQ band offers fully parametric control with precise frequency selection, adjustable Q, and accurate gain control. The frequency resolution is high enough for mastering applications where you might need to make very subtle moves, and the Q range goes tight enough for surgical cuts while still offering broad, musical boosts. You get five bands of parametric EQ plus high-pass and low-pass filters, which covers everything you typically need for mastering.
The filter slopes on the high and low pass sections are selectable, giving you options from gentle 6dB per octave up to steep 48dB per octave. Gentle slopes sound more natural and preserve the tonal balance better, while steep slopes are useful when you need to completely remove unwanted frequencies. The resonance control on the filters lets you add a little peak at the corner frequency, which can restore some energy that steep filtering might otherwise remove.
What makes OAQ valuable for mastering is how transparent the processing remains even when you’re making multiple EQ moves. The phase response stays coherent, and the summing stays clean, which means you can make several corrections without the mix falling apart tonally. There’s a spectrum analyzer with switchable views for mid, side, or stereo content, helping you identify problems and verify your corrections. The output level meter shows peak and RMS levels so you can monitor your final output carefully.
Analog Obsession LOADES
- Compatibility: Win10, Win11, Apple Silicon, macOS 10.12+
- Format: VST, VST3, AU, AAX, 64-bit
- Price: Free
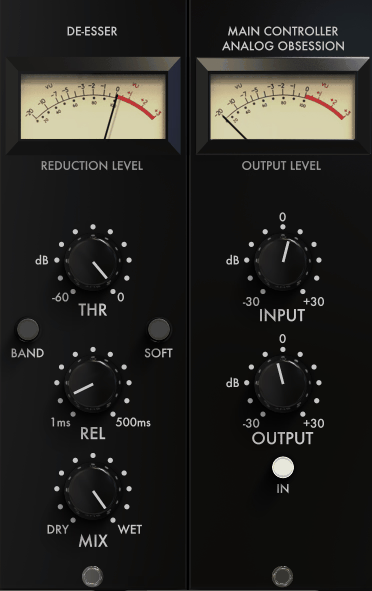
De-essing is one of those tasks that can make or break a vocal track, and LOADES handles it with enough control to tame harsh sibilance without making vocals sound lispy or dull. The plugin focuses specifically on reducing excessive high-frequency energy in the 4-10kHz range where sibilance typically lives.
The frequency control lets you target exactly where the problematic sibilance sits in your particular recording. Every voice and microphone combination produces sibilance at slightly different frequencies, so being able to dial in the exact spot is essential for natural-sounding results. The bandwidth control adjusts how wide a frequency range gets affected, with narrower settings being more surgical and wider settings catching more of the sibilant range.
You’ll find both threshold and range controls that work together to determine how much de-essing happens. The threshold sets where the processing kicks in, and the range controls how much gain reduction occurs once sibilance triggers the processor. Getting these two settings balanced properly is the key to natural results because too much reduction sounds obvious while too little doesn’t solve the problem.
The listen mode lets you solo the frequency range being processed, which makes it much easier to identify where sibilance is occurring and verify that you’re targeting the right frequencies. You can sweep the frequency control while in listen mode to find the exact spot where sibilance jumps out, then switch back to normal operation to set your reduction amount. This workflow is faster and more accurate than trying to guess based on the full signal.
The plugin includes a lookahead function that helps it catch sibilant transients before they pass through, resulting in smoother, more transparent reduction. There’s also a stereo link control that determines whether the left and right channels trigger the de-esser independently or together, which matters when you’re processing stereo vocal recordings or effects returns. The gain reduction meter shows you exactly when and how much the de-esser is working, helping you verify that it’s only engaging on actual sibilance rather than constantly processing the entire vocal.
Analog Obsession CHANNEV
- Compatibility: Win10, Win11, Apple Silicon, macOS 10.12+
- Format: VST, VST3, AU, AAX, 64-bit
- Price: Free
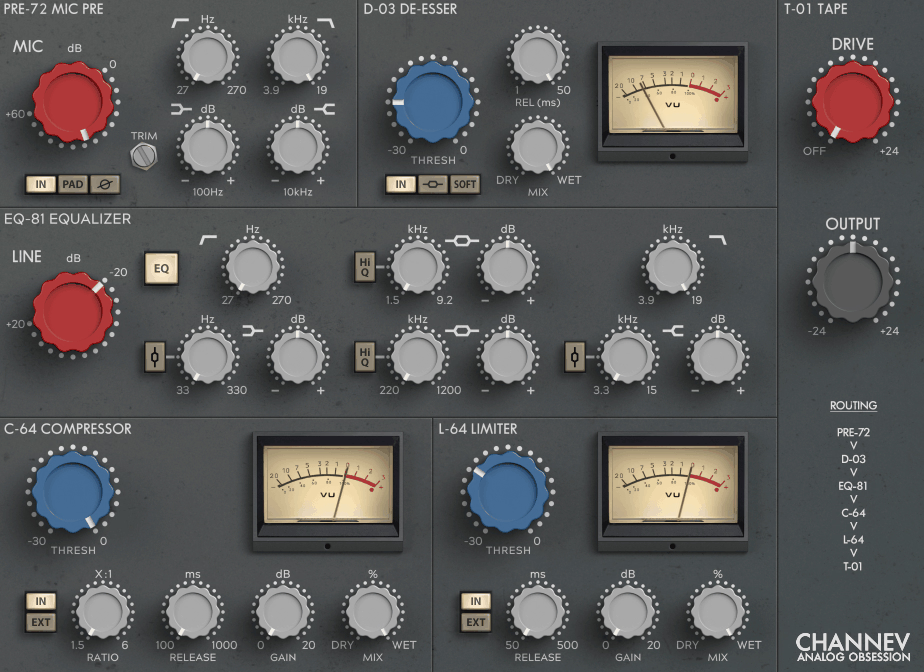
The Neve-style channel strip sound from CHANNEV brings that thick, warm character that’s been essential in professional recording for generations. This isn’t just about the EQ curve or the compressor ratios but also about how the whole signal path colors your sound in a musical way.
The preamp section adds some of that Neve transformer saturation before the signal hits the EQ and dynamics sections, which means you’re starting with a warmer, slightly more harmonically rich signal. You can adjust how much input gain you’re feeding into the preamp, with higher levels producing more saturation and color. The impedance control changes how the input stage responds to your source, affecting both the frequency response and the overall tone.
In the EQ section, you get the characteristic three-band design with high and low shelving plus a sweepable midrange band. The low-frequency shelf adds weight and foundation without making things boomy, while the high-frequency shelf brings out air and detail. The midrange band is fully parametric with variable frequency and Q, letting you enhance presence or reduce problem frequencies depending on what the track needs.
The dynamics section combines a compressor and gate in one unit, giving you complete control over both dynamic expansion and compression. The compressor has that smooth, musical response that Neve-style processors are known for, with attack and release times that work well on vocals, drums, and most other sources. The gate helps clean up noise between phrases or tighten up recorded tracks without sounding choppy.
What makes this channel strip valuable is how the different sections work together as a complete signal path. The preamp colors the sound slightly, the EQ shapes it musically, and the dynamics control sits naturally in the mix. There’s also a phase reverse switch and high-pass filter at the input stage, plus output level control and metering that shows both input and output levels along with gain reduction.
Analog Obsession ATTRACTOR
- Compatibility: Win10, Win11, Apple Silicon, macOS 10.12+
- Format: VST, VST3, AU, AAX, 64-bit
- Price: Free
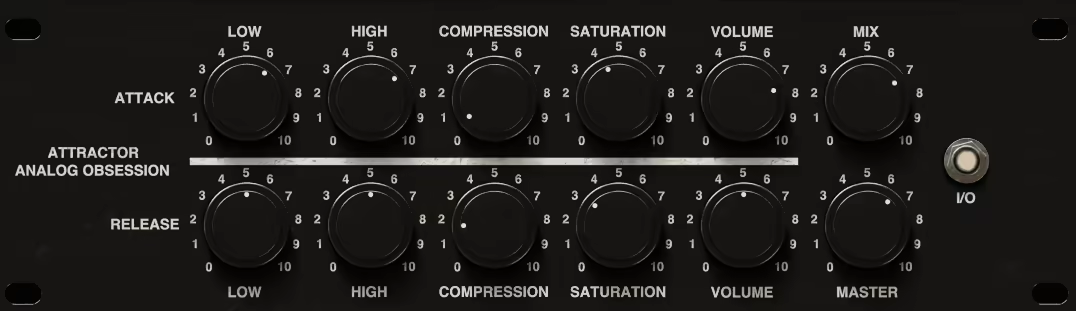
Transient processing with ATTRACTOR gives you direct control over the attack and sustain portions of your sounds, which is useful for reshaping drums, adding punch to guitars, or controlling the envelope of just about any percussive source. This processor works differently than compression because it’s specifically targeting the initial hit versus the body of the sound.
The attack control determines how much you’re emphasizing or reducing the initial transient. Boosting attack makes drums hit harder and percussion feel more aggressive, while reducing attack can smooth out overly sharp transients or help sounds sit back in the mix. The sustain control affects the body and tail of the sound, letting you add length and weight or tighten things up and make them more focused.
What’s powerful about independent transient control is that you can increase attack while decreasing sustain to make drums punchier and tighter, or decrease attack while increasing sustain to make things smoother and more even. These opposite adjustments give you shaping options that compression alone can’t achieve because you’re working with different parts of the signal envelope independently.
The speed control adjusts how quickly the processor responds to transients in your source material. Faster settings catch sharp, quick transients like snare drums and hi-hats, while slower settings work better on sources with gradually building attacks like toms or bass guitar. Getting the speed right for your source material makes the difference between natural-sounding enhancement and obvious processing artifacts.
There’s a sidechain filter that helps the processor focus on the right frequency range when detecting transients. You can filter out low frequencies so the processor responds to the snap of a snare rather than the thud of a kick drum, or focus on high frequencies to emphasize stick hits and cymbal attacks. The gain compensation helps you maintain consistent levels as you adjust the attack and sustain controls, which makes it easier to judge your changes without level differences fooling your ears.
The plugin includes both input and output metering along with a gain reduction display that shows when the processor is actively affecting your signal. There’s also a clip indicator that warns you when you’re hitting the output too hard, and a bypass switch for quick A/B comparison. The mid-side processing mode lets you apply different transient shaping to the center versus the sides of your stereo field, which can be useful for adding width to drum overheads or reshaping stereo guitar recordings.
Hello, this blog is about more than just chorus, bass and synths. In fact, I started it to cover best VST plugins and Kontakt libraries, so you have easier time finding the right tools and instruments for your music production needs, mixing, as well as mastering. New tools and instruments are constantly evolving and need to get in front of audience, because even some of the best brands like Antelope Audio aren’t talked about enough – that’s what I want to change. I want to promote plugins that are less known but are perfectly relevant for certain topics.